
On every modern point and shoot, DSLR and mirrorless camera there are modes meant for people just want to take pictures. For more serious photographers, you're better off not using these modes. Here's why I think so.
Note: This article is my subjective opinion and should be taken too seriously. All of the test photos here were taken using the Canon 18-55mm f3.5-5.6 kit lens that came with my camera. Yes, it's not the best lens in the world, but it does a decent enough job to get the points across.
Portrait Mode
This mode is meant to take a picture of your subject, be it a person, pet or thing. Like Auto mode, the camera adjusts for everything, from exposure settings to white balance. While the exposure settings are acceptable, the white balance is where it falls apart.
The images below were taken next to a window where light was reflected off my neighbor's house.

ISO 800, f/4 and 1/50 at 24mm... that's me by the way. The blue hue makes me look kind of dead.
Just for reference, both of these photos are using the same exposure settings. The left photo was taken in manual mode with white balance set to "shade" (7000k). The right photo was taken with portrait mode with automatic white balance. As you can see the right image has a bluish cast on me. In a shaded area, the light should look warmer against my skin. While this can be fixed in post, it's better to get as much right in camera as possible.
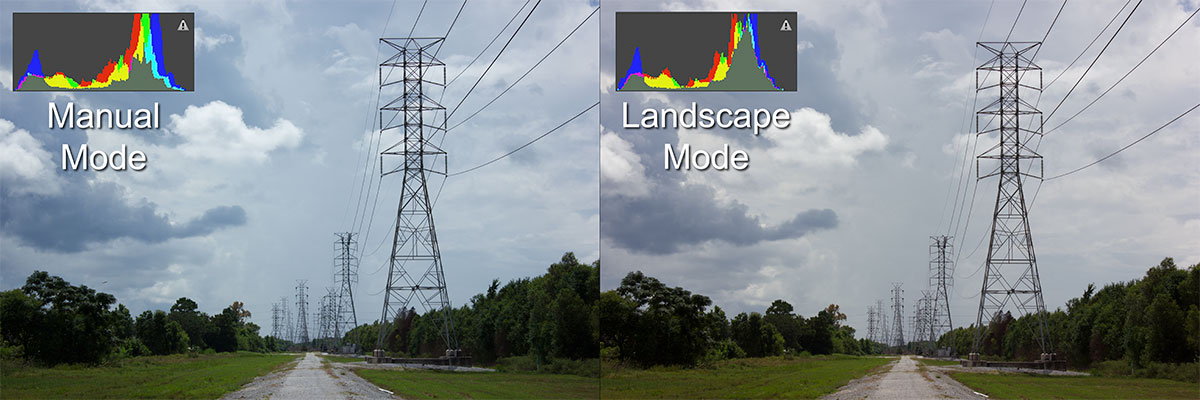
Landscape Mode
Landscape photography is not hard to achieve using a DSLR. You'd meter for the sky, make sure your white balance and picture styles are in check, focus to infinity and you're off to the races.

Shooting to the North
Manual Mode: ISO 100, f/5.6, 1/1000 at 49mm. Flat is good for post processing.
Landscape Mode: ISO 100, f/11, 1/200 at 49mm. So much contrast.
Compared to Landscape mode, my manual settings stacked up pretty well, despite the fact that I used a smaller aperture and faster shutter speed. The only real difference I can see is the contrast as seen in the histograms. This is thanks again to the white balance.
The midday sun was absolutely bright, despite the sky being mostly cloudy. Logically I set my white balance to Daylight (5200k), but it ended up looking more blue than the Landscape mode, which favored more green and yellow. I was pretty sure the clouds weren't to blame as the sun was out both times I shot.
Shooting to the South
Manual Mode: ISO 100, f/5.6, 1/1000 at 49mm
Landscape Mode: ISO 100, f/11, 1/200 at 49mm
Looking at the example above, the sun was out when I took these shots. Landscape mode has a tighter contrast than my settings. But because it has a tighter contrast, it not only favors more of the yellow, it also loses details in the shadows as seen in the trees.
Macro Mode
The macro mode (or "close up" as it is called on Canon cameras) is meant to take a picture of a small object, such as a ring, coin or flower. The downside is that it will turn the focus wheel on the lens all the way down to its lowest setting despite the focusing distance. Unless the user understands that lenses have minimum focusing distances, they may end up with nothing but blurry photos.
On the other hand, getting proper exposure in macro mode can be hit or miss.
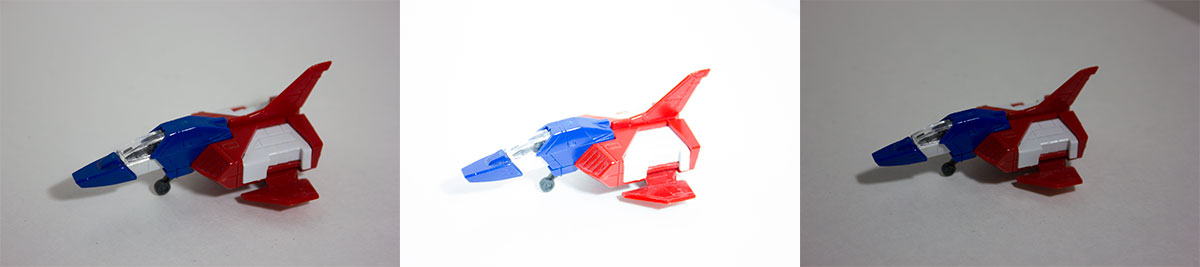
ISO 100, f/5.6, 1/200 at 55mm with external flash (Gundam much?)
Again, the left-most photo was taken in manual mode. The middle photo was taken in macro mode with the flash on. As you can see the middle photo was blown out by the flash. Too much of the detail was lost because the camera exposed for the scene but still triggered the flash. The right-most photo was taken with macro mode but with the flash off. While it did a better job of exposing for the scene, the overall image was underexposed, and much of the detail in the shadows are lost. Hence you can achieve better macro using manual focus and exposure settings.
Sports Mode
Sports is basically used for fast moving objects. As its name implies, it is used to shoot sports. What this mode does is speed up the shutter speed to "freeze" the subject in motion. This is normal, but there are two weaknesses to Sports mode. Continuous Auto-focus can be hit and miss as seen in the series below.

Sports Mode in action... whee!
Out of the five photos in the series, only the middle photo is in focus. Tracking a moving object can be difficult, especially if it's close up. This is thanks in part to the second weakness of sports mode: the motor drive.
Motor drive, also known as continuous shooting, is used in attempt to get the "perfect shot" of a moving object. Not only is getting a sharp focus of a moving object can be challenging in sports mode while using motor drive, it can use up a lot of space on your camera's memory card.
Why Aren't Program and Auto not on this list?
These are modes that you would use if you're handing your camera to someone who may not know their way around your device. For the absolute beginner or a stranger on the street, Program or Auto will work just fine. As long as your camera has an auto-focusing lens, anyone can take a picture with it.
Overall I find that most of the modes I described here can be useful to the lay person, but they're just not for me. I prefer to have more control of my photos.
What do you think? Are these modes useful to you? Do use of these modes vary from camera to camera? Let me now what you think!